
Wiki
Wiki
Audio Monitoring & Streaming
Audio Monitoring & Streaming
This article covers how audio works in Sonoros in depth: setting up your devices, assigning monitoring channels, streaming to clients, and mirroring audio back to the server.
Setting up your audio devices
Open Setup > General from the sidebar and scroll to Audio Monitoring Settings.
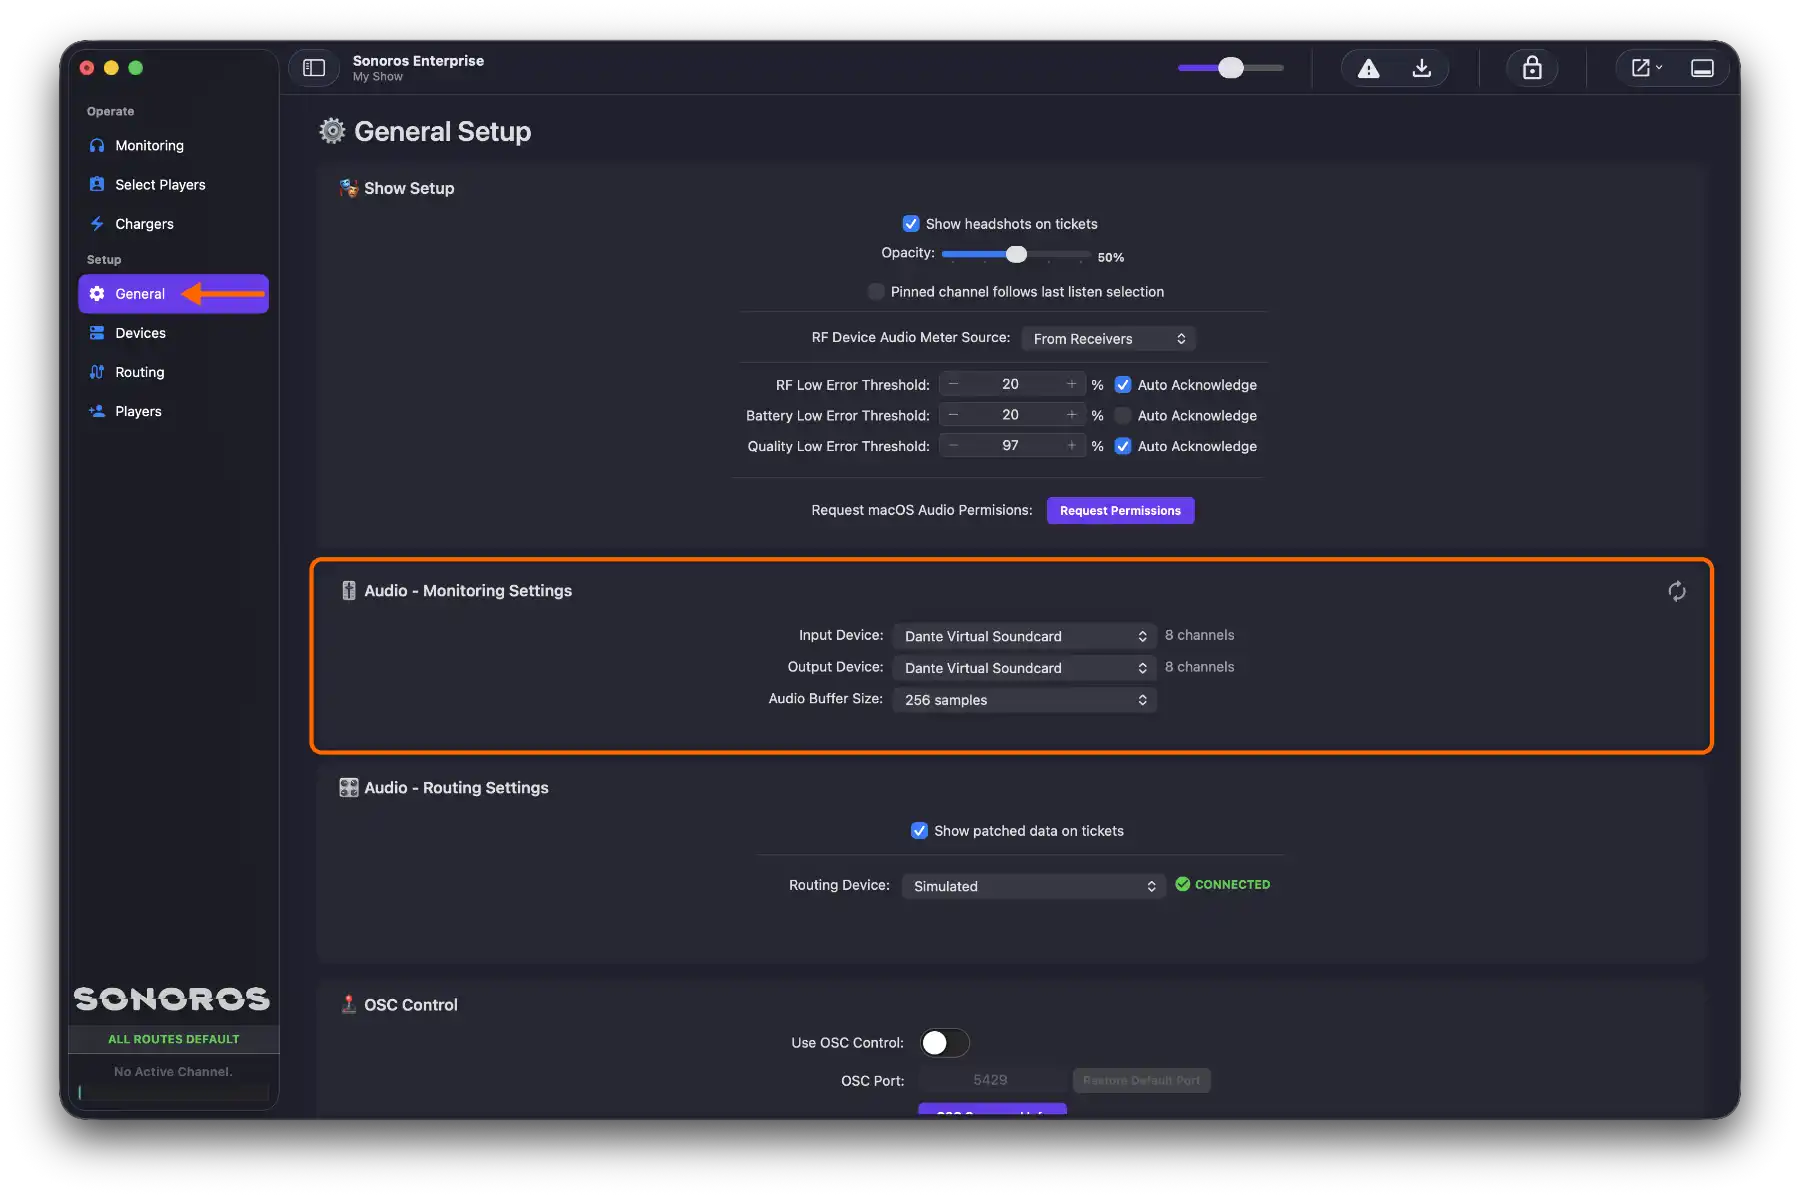
Set your Input Device and Output Device. Sonoros uses standard macOS audio devices, so anything your system can see will appear here: a Dante Virtual Soundcard, a MADIface, a built-in interface, or anything else macOS recognises.
Click Apply when done.

Note: macOS may ask for microphone permission the first time Sonoros ingests audio. Grant it when prompted. If you missed the prompt, click Request Permissions in Setup > General, or grant it manually in System Settings > Privacy & Security > Microphone.
Audio buffer size
The buffer size setting controls the trade-off between CPU load and stability. A lower buffer uses more CPU and gives lower latency; a higher buffer is more forgiving under load. If you're running a large channel count and experiencing audio dropouts or instability, increasing the buffer size is the first thing to try.
Reset audio engine
If you encounter audio issues after changing devices or settings, click the Reset button in the Audio Monitoring Settings section to restart the audio engine without having to close your show.

Note: Sonoros handles all internal sample rate conversion automatically. Your input and output devices do not need to share a clock domain.
Setting audio monitoring channels
An audio monitoring channel tells Sonoros which Core Audio input channel corresponds to a given device: this is what it plays when you click that device's ticket. There are three ways to set or change it.
From the Devices tab
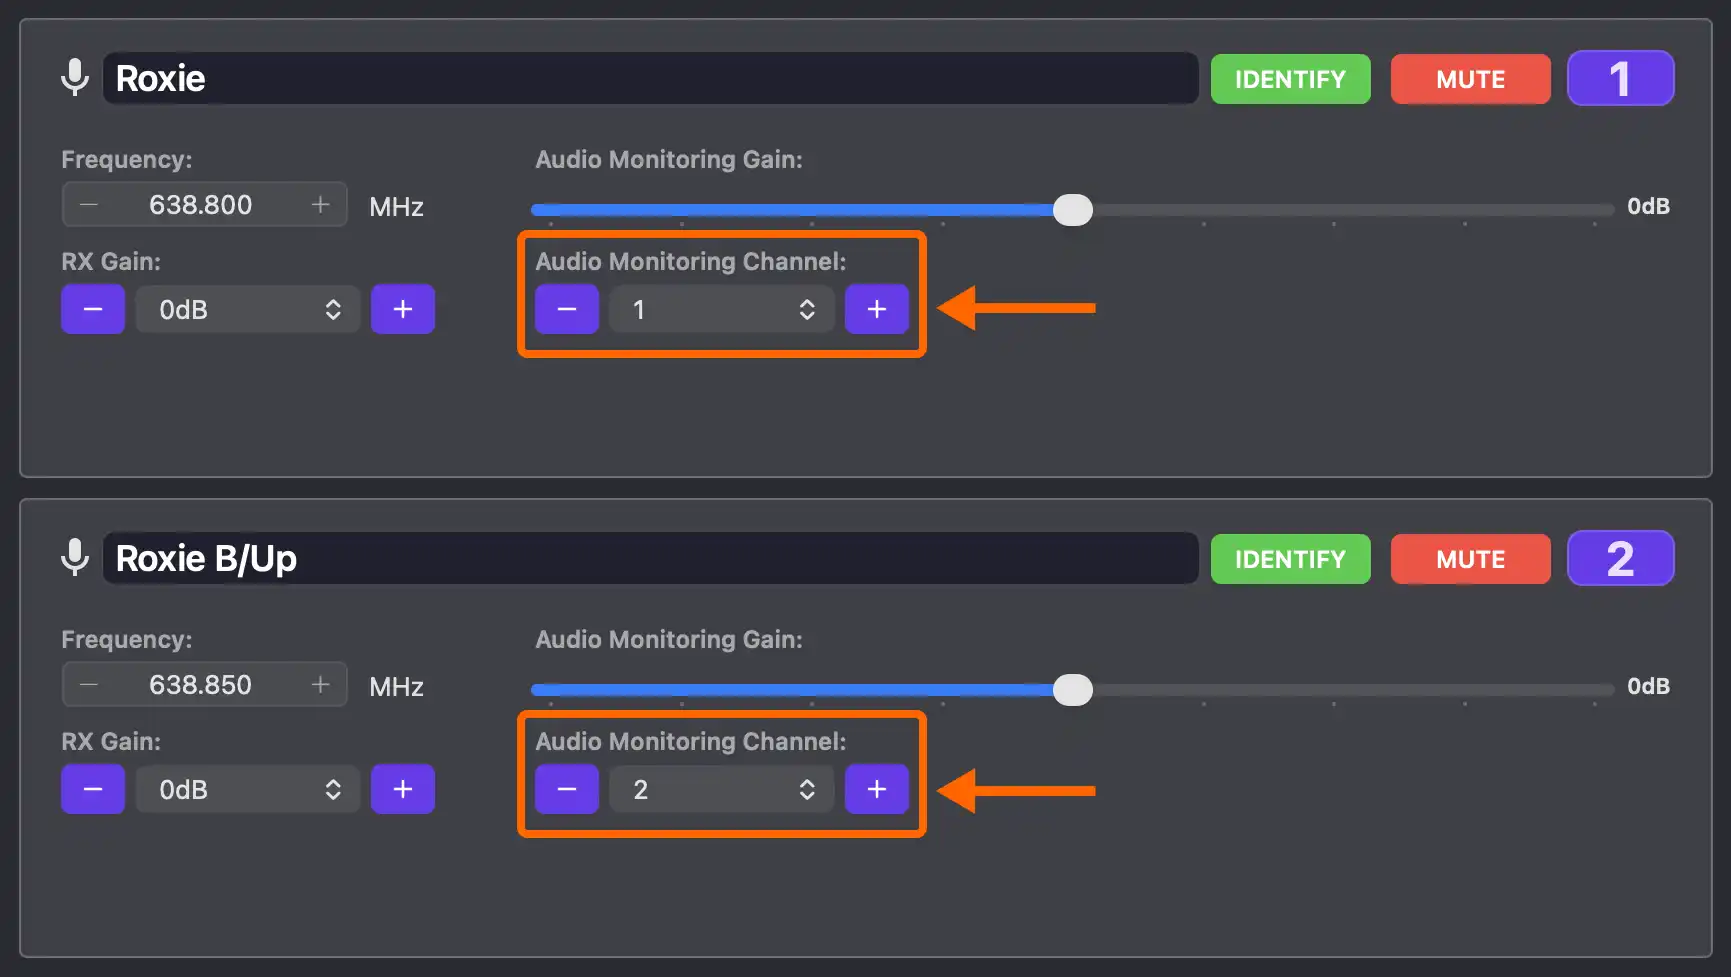
Select a device in Setup > Devices and set the Audio Monitoring Channel from the device detail panel. You can also switch between mono and stereo input here.
When adding a device
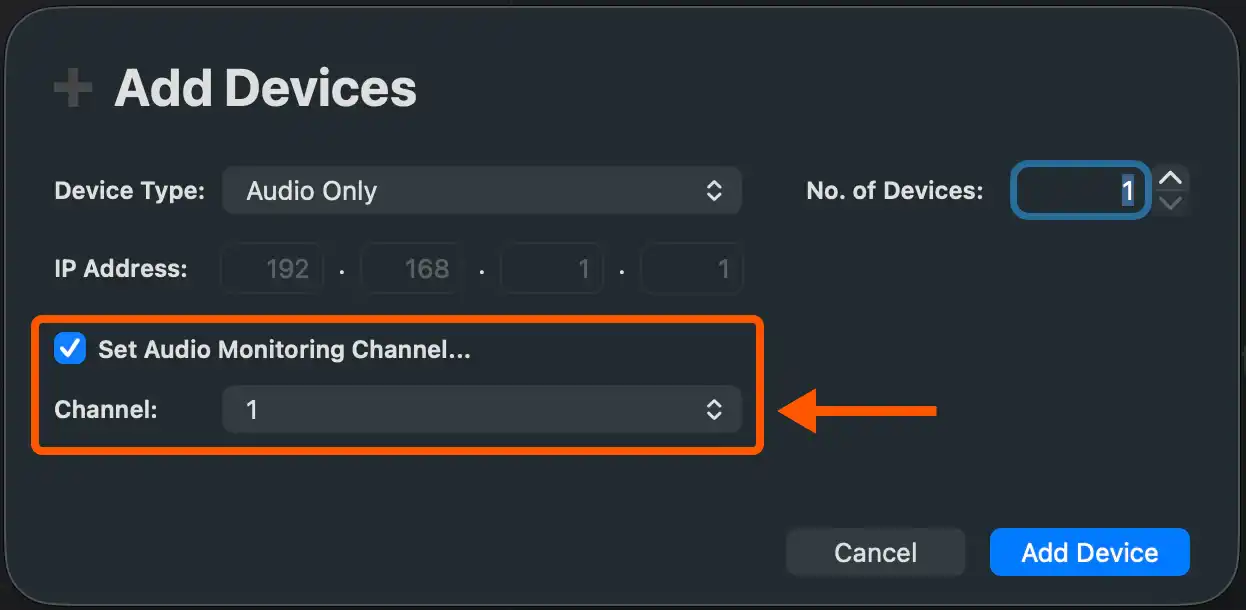
In the Add Devices popup, tick Set Audio Monitoring Channel and select the channel before confirming. See Set Up Your Show for the full add-device flow.
Batch editing via the Routing tab
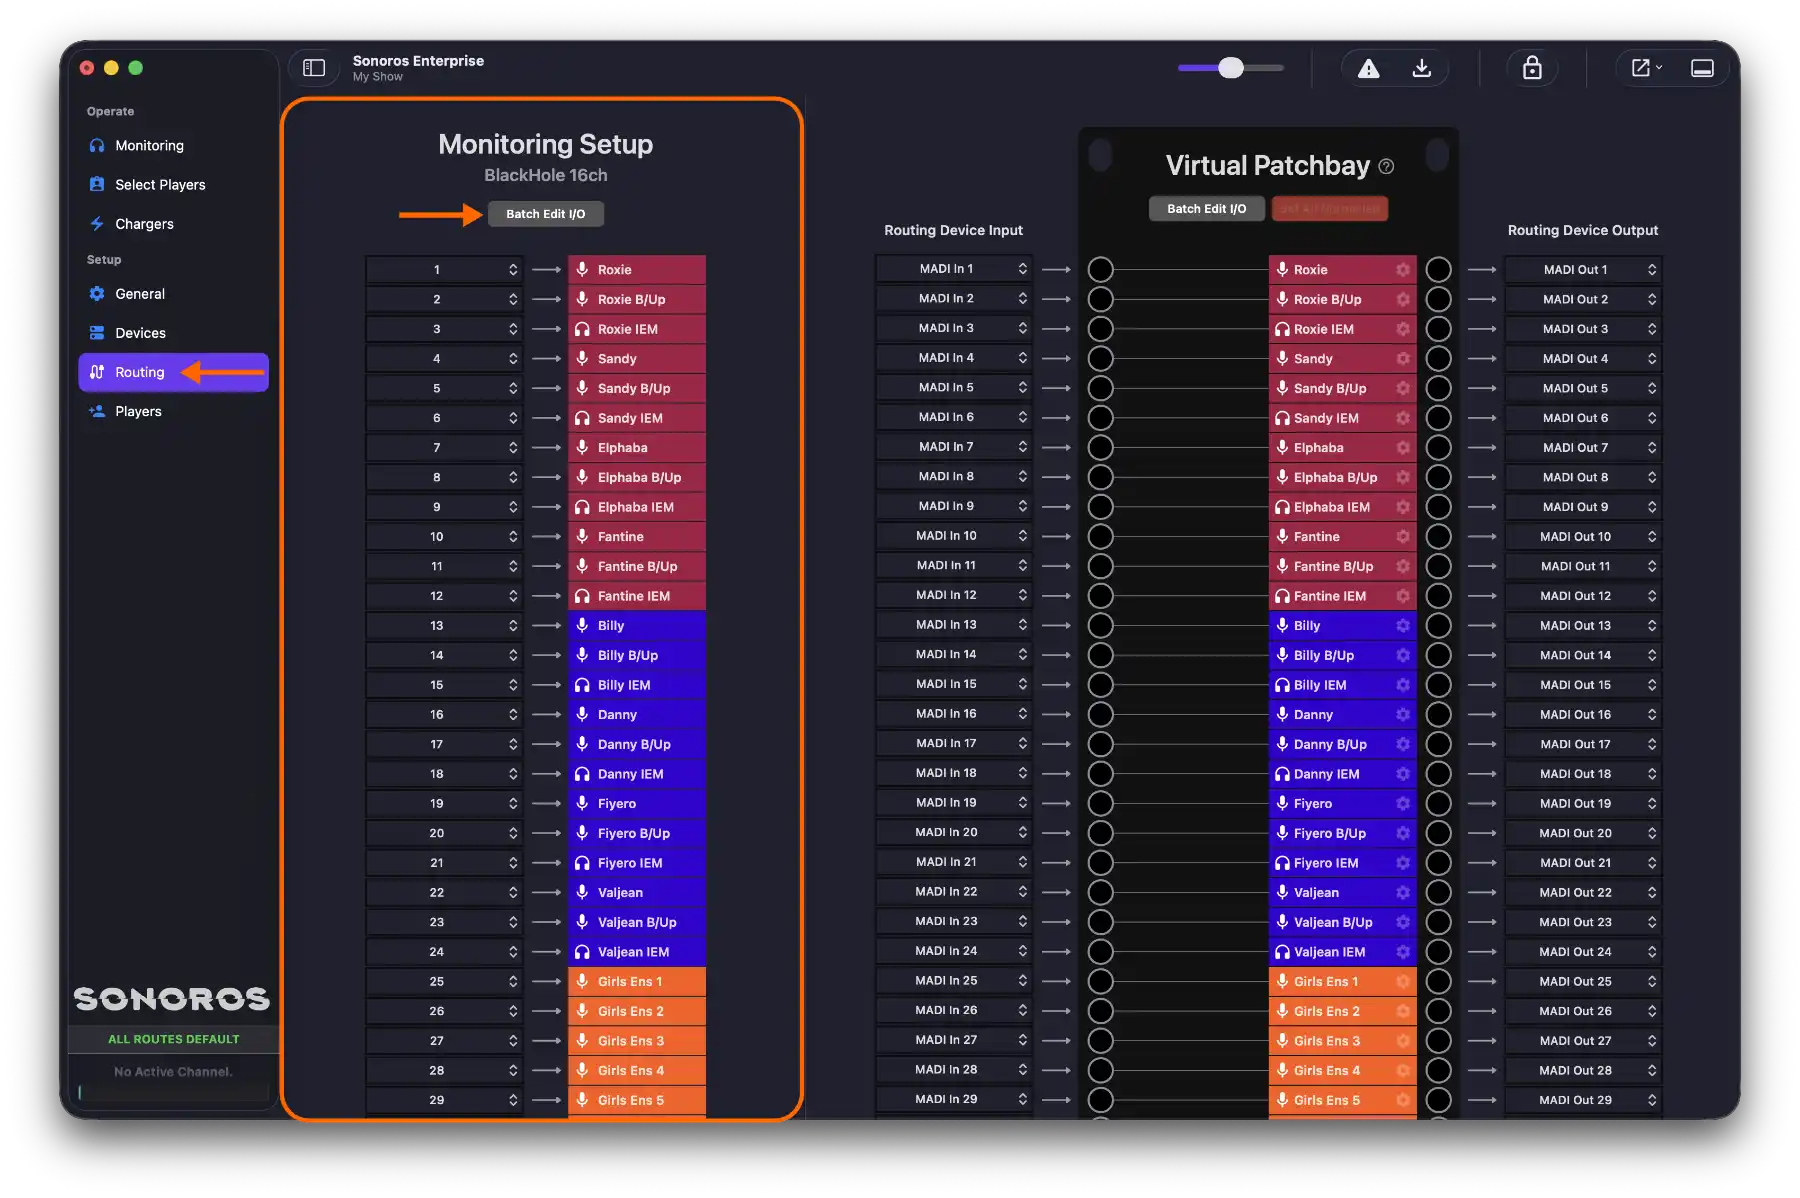
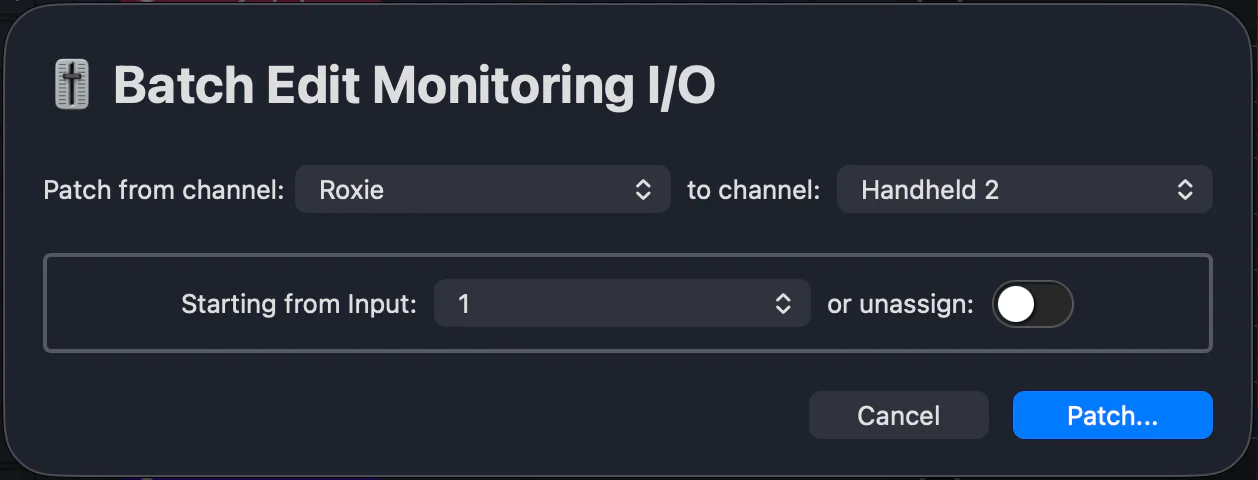
To reassign audio monitoring channels across multiple devices at once, go to Setup > Routing and use the batch edit I/O controls.
RF device audio meter source
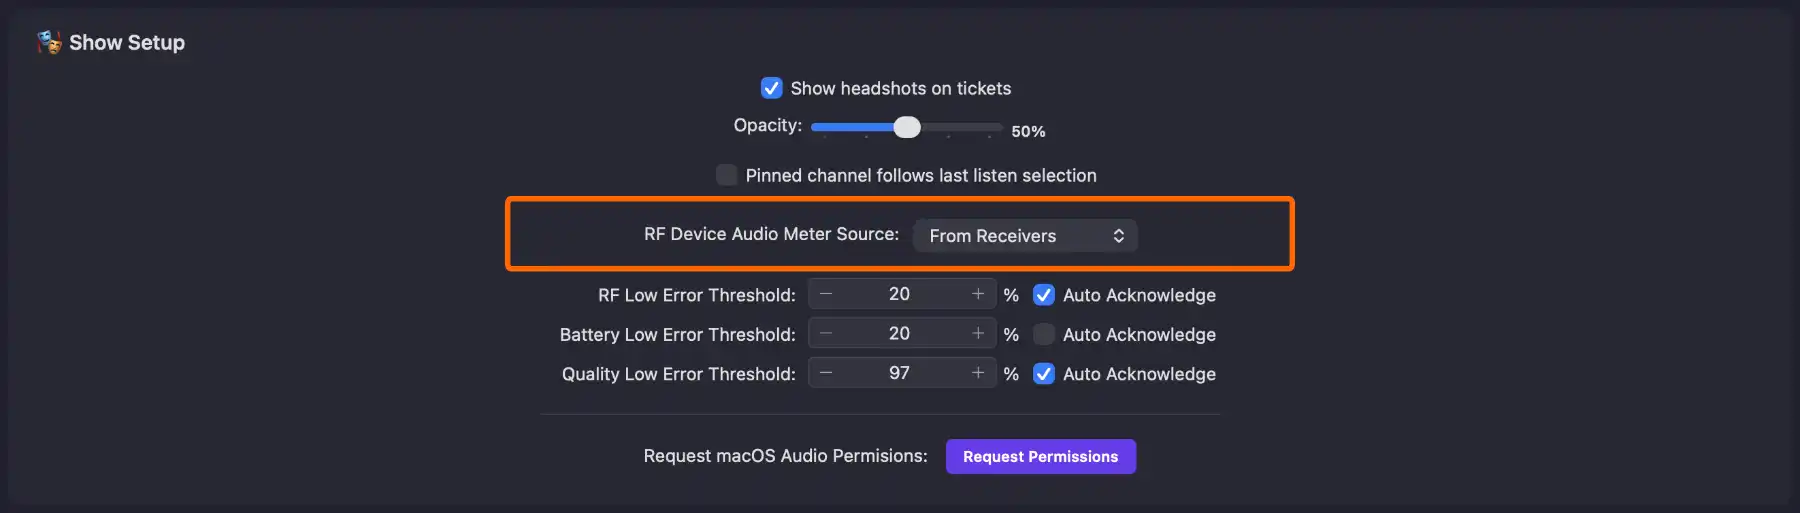
By default, the AF metering shown on channel tickets is driven by the audio coming from the RF receiver itself. You can change this to use the audio monitoring input instead: useful if your receivers don't report AF level, or if you want the meters to reflect what's actually arriving at the Mac.
Find the RF Device Audio Meter Source dropdown in Setup > General and select your preferred source.
Monitoring audio
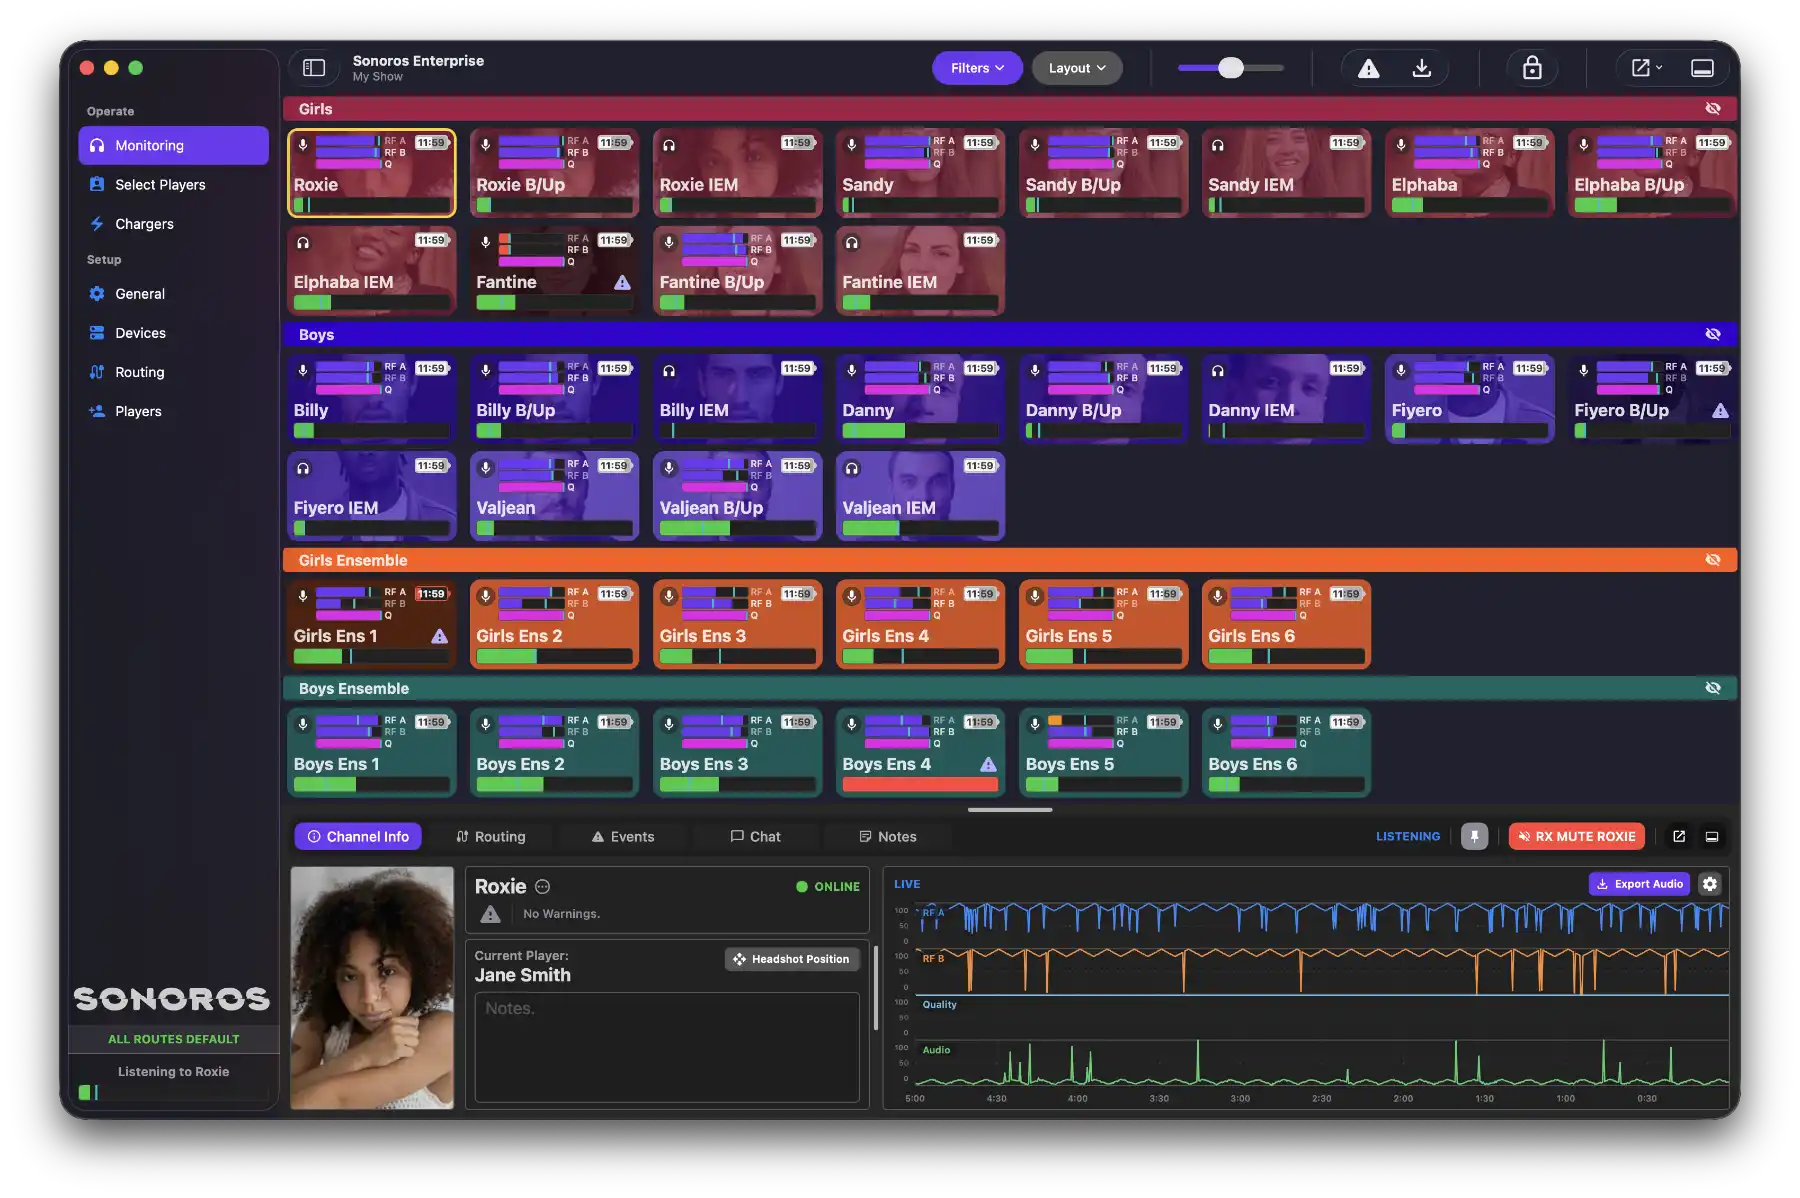
Switch to the Monitoring tab. Each device appears as a channel ticket showing live RF data and metering.
Click any ticket to start listening to that channel's audio through your output device.
Tip: To stop listening, click Listening To... in the sidebar from anywhere in the app, or press Esc.
Audio on clients
When a client connects to a show, clicking a channel ticket streams that channel's audio from the server to the client over the network, playing through the client's own audio device. The experience is the same as on the server. See Set Up Your Show for the connection steps.
Streaming settings
The streaming algorithm has two tuning parameters: Diversity and Latency. These are for advanced users and should only be adjusted if you're experiencing dropouts.
From Setup > General, start with the lowest diversity and lowest latency settings under Audio Monitoring Settings. If you get dropouts in a specific area of the venue, try increasing these values and see if that resolves it. Higher diversity and latency make the stream more resilient at the cost of increased delay.

Audio mirroring
Audio mirroring is a separate mechanism from client audio playback. On Pro and above licences, a client can route whatever it's currently monitoring back to a physical output on the server Mac, rather than (or in addition to) playing it locally. This is useful for feeding an IEM mix or a direct monitor from the server.
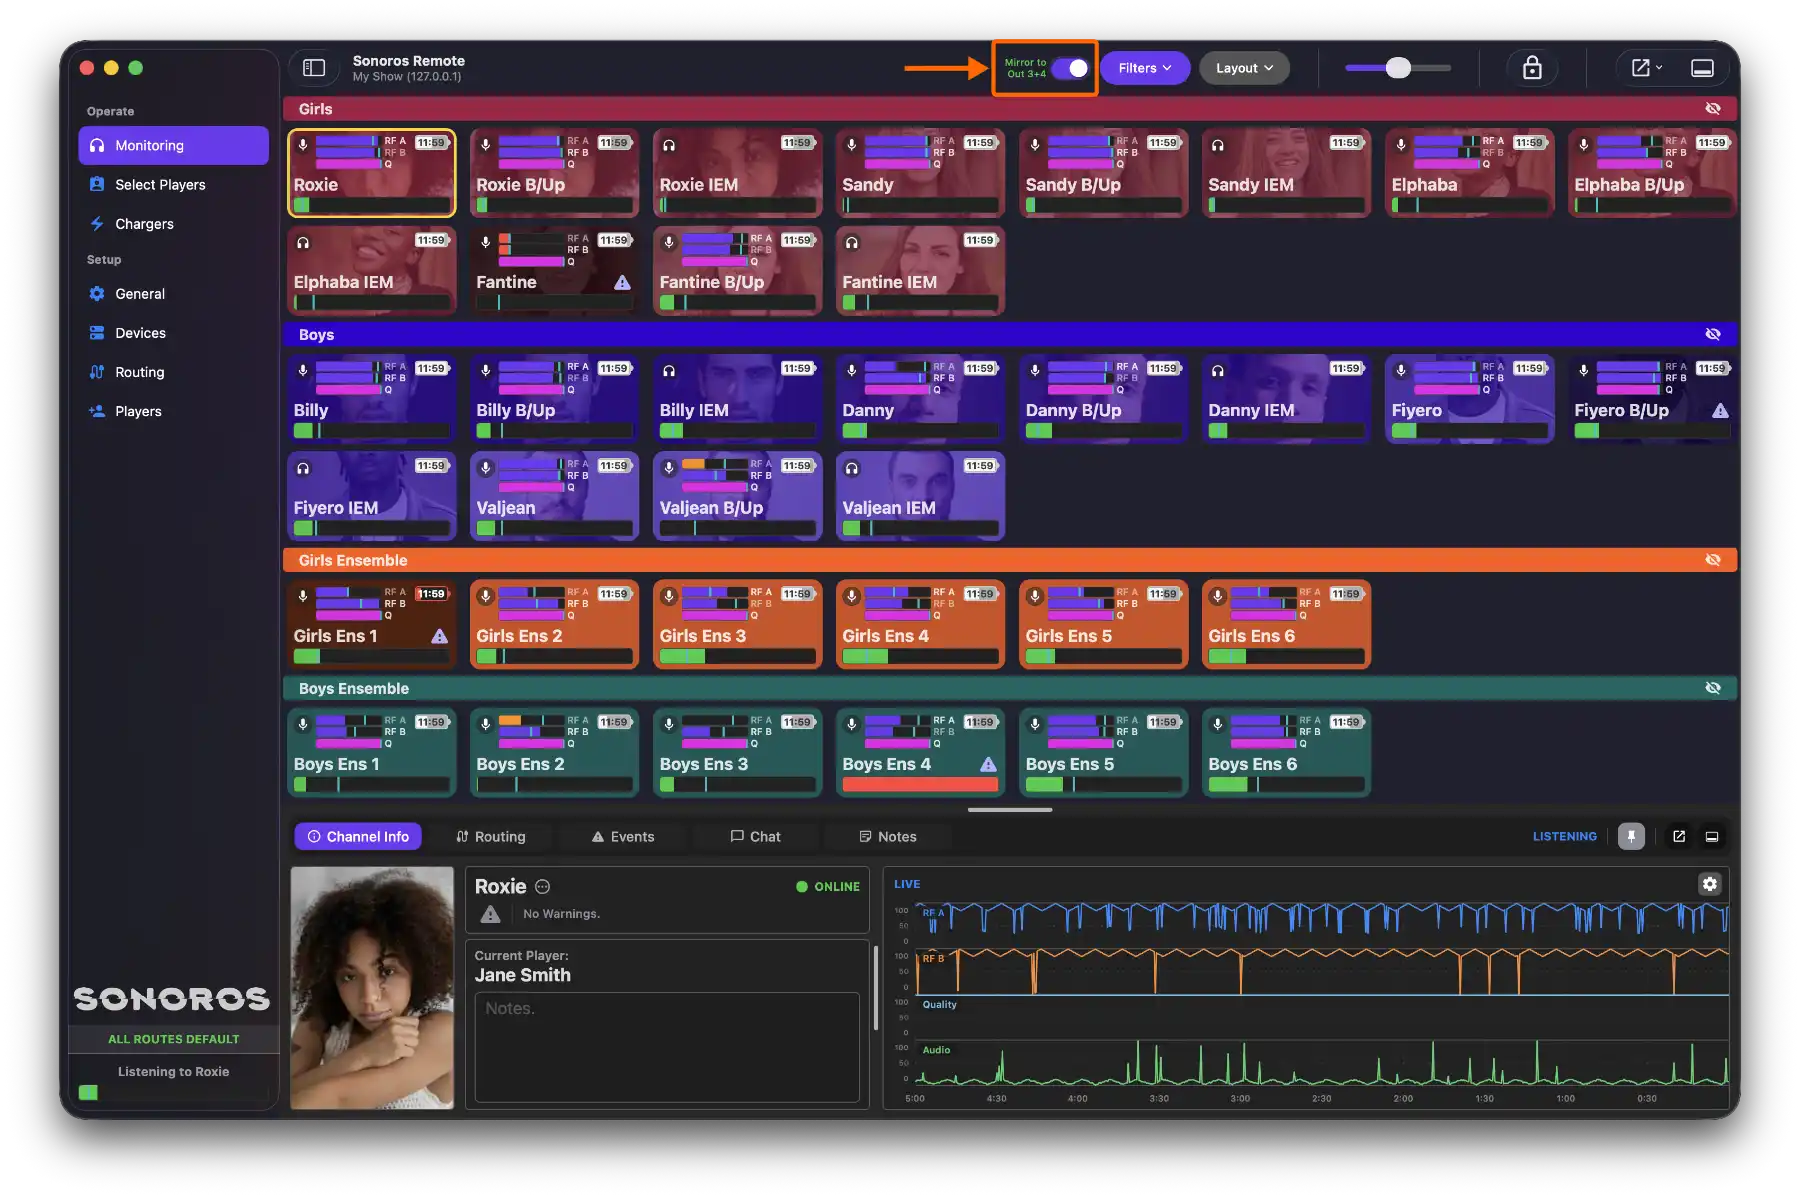
Audio mirroring is configured from the client. Open the client's audio settings in Setup > General and select the Mirroring Channel. The audio will then appear on the corresponding output of the server's audio device when mirroring is enabled.

This article covers how audio works in Sonoros in depth: setting up your devices, assigning monitoring channels, streaming to clients, and mirroring audio back to the server.
Setting up your audio devices
Open Setup > General from the sidebar and scroll to Audio Monitoring Settings.
Set your Input Device and Output Device. Sonoros uses standard macOS audio devices, so anything your system can see will appear here: a Dante Virtual Soundcard, a MADIface, a built-in interface, or anything else macOS recognises.
Click Apply when done.
Note: macOS may ask for microphone permission the first time Sonoros ingests audio. Grant it when prompted. If you missed the prompt, click Request Permissions in Setup > General, or grant it manually in System Settings > Privacy & Security > Microphone.
Audio buffer size
The buffer size setting controls the trade-off between CPU load and stability. A lower buffer uses more CPU and gives lower latency; a higher buffer is more forgiving under load. If you're running a large channel count and experiencing audio dropouts or instability, increasing the buffer size is the first thing to try.
Reset audio engine
If you encounter audio issues after changing devices or settings, click the Reset button in the Audio Monitoring Settings section to restart the audio engine without having to close your show.
Note: Sonoros handles all internal sample rate conversion automatically. Your input and output devices do not need to share a clock domain.
Setting audio monitoring channels
An audio monitoring channel tells Sonoros which Core Audio input channel corresponds to a given device: this is what it plays when you click that device's ticket. There are three ways to set or change it.
From the Devices tab
Select a device in Setup > Devices and set the Audio Monitoring Channel from the device detail panel. You can also switch between mono and stereo input here.
When adding a device
In the Add Devices popup, tick Set Audio Monitoring Channel and select the channel before confirming. See Set Up Your Show for the full add-device flow.
Batch editing via the Routing tab
To reassign audio monitoring channels across multiple devices at once, go to Setup > Routing and use the batch edit I/O controls.
RF device audio meter source
By default, the AF metering shown on channel tickets is driven by the audio coming from the RF receiver itself. You can change this to use the audio monitoring input instead: useful if your receivers don't report AF level, or if you want the meters to reflect what's actually arriving at the Mac.
Find the RF Device Audio Meter Source dropdown in Setup > General and select your preferred source.
Monitoring audio
Switch to the Monitoring tab. Each device appears as a channel ticket showing live RF data and metering.
Click any ticket to start listening to that channel's audio through your output device.
Tip: To stop listening, click Listening To... in the sidebar from anywhere in the app, or press Esc.
Audio on clients
When a client connects to a show, clicking a channel ticket streams that channel's audio from the server to the client over the network, playing through the client's own audio device. The experience is the same as on the server. See Set Up Your Show for the connection steps.
Streaming settings
The streaming algorithm has two tuning parameters: Diversity and Latency. These are for advanced users and should only be adjusted if you're experiencing dropouts.
From Setup > General, start with the lowest diversity and lowest latency settings under Audio Monitoring Settings. If you get dropouts in a specific area of the venue, try increasing these values and see if that resolves it. Higher diversity and latency make the stream more resilient at the cost of increased delay.
Audio mirroring
Audio mirroring is a separate mechanism from client audio playback. On Pro and above licences, a client can route whatever it's currently monitoring back to a physical output on the server Mac, rather than (or in addition to) playing it locally. This is useful for feeding an IEM mix or a direct monitor from the server.
Audio mirroring is configured from the client. Open the client's audio settings in Setup > General and select the Mirroring Channel. The audio will then appear on the corresponding output of the server's audio device when mirroring is enabled.